Shopify: adding additional information about the user
In this article we will add a form with the ability to add a more detailed description of the user – phone number, address, company name, and so on.
Let’s create a form where the user can write additional information about himself, but we will not model this form in this article.
So, let’s start. We have special template addresses.liquid, which is responsible for adding additional information about the user.
1.Creating a template
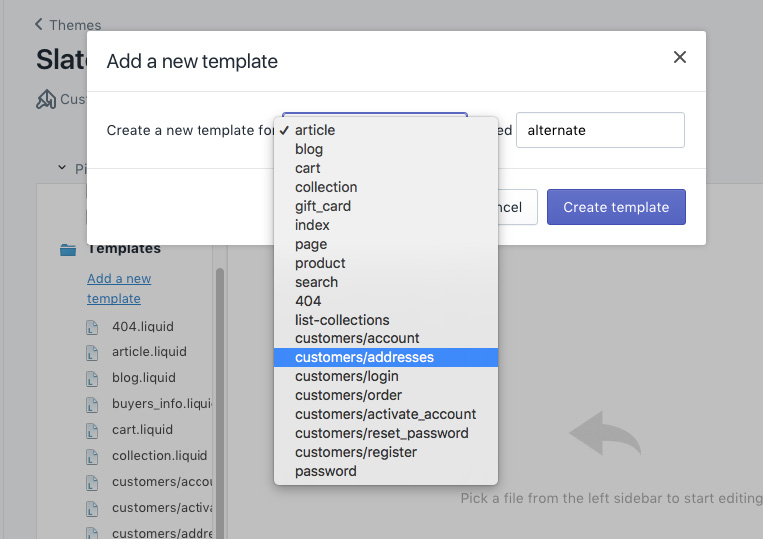
If you don’t have this template, you can create it via the admin panel. For this we go to the theme editor, click the button ‘Add a new template’, and create addresses.liquid template.
2.Creating a structure
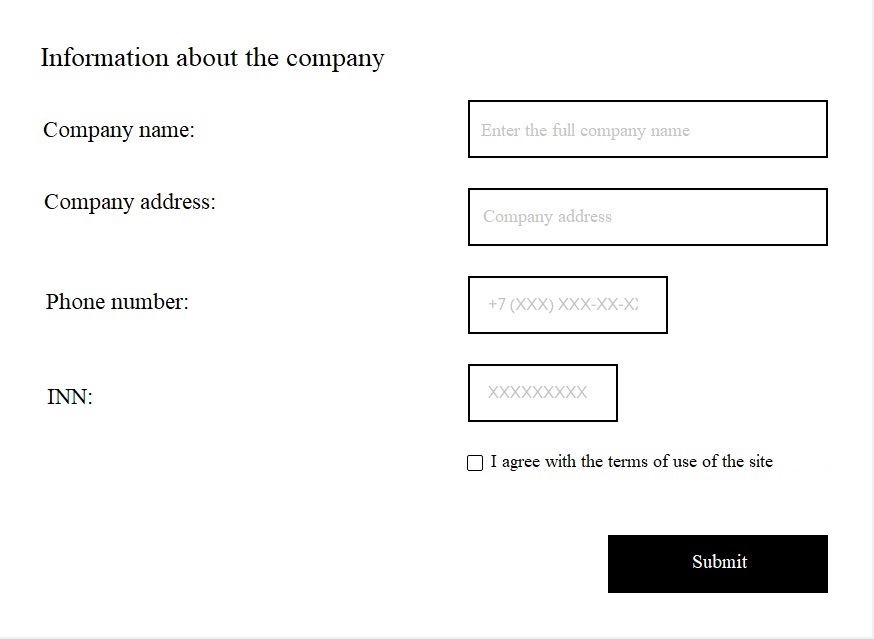
Paste the code below in the file addresses.liquid, previously removing all that you have there.
<div class="form_wrap">
	<h3 class="form_title">Information about the company</h3>
	<ul class="input_list">
		<li class="input_item">
			<dl class="form_cell">
				<dt class="form_cell_title">
					<label for="user_company">Company name:</label>
				</dt>
				<dd class="form_field_wrap">
					<input type="text" id="user_company" placeholder="Enter the full name of the company" name="address[company]" class="form_field">
				</dd>
			</dl>
		</li>
		<li class="input_item">
			<dl class="form_cell">
				<dt class="form_cell_title">
					<label for="user_company">Company address:</label>
				</dt>
				<dd class="form_field_wrap">
					<input type="text" id="user_company" placeholder="Company address" name="address[address1]" class="form_field ">
				</dd>
			</dl>
		</li>
		<li class="input_item">
			<dl class="form_cell">
				<dt class="form_cell_title">
					<label for="user_phone">Phone number:</label>
				</dt>
				<dd class="form_field_wrap">
					<input type="tel" id="user_phone" placeholder="+7 (XXX) XXX-XX-XX" name="address[phone]" class="form_field">
				</dd>
			</dl>
		</li>
		<li class="input_item">
			<dl class="form_cell">
				<dt class="form_cell_title form_v2_mod">
					<label for="user_inn">INN:</label>
				</dt>
				<dd class="form_field_wrap">
					<input type="text" id="user_inn" placeholder="ХХХХХХХХХХ" name="address[zip]" class="form_field">
				</dd>
			</dl>
		</li>
		<li class="input_item row_mod right_mod">
			<label class="radio_check">
				<input required name="check" type="checkbox" checked="checked" class="radio_check_input"><span class="radio_check_text">I agree with the terms of the use of the site</span>
			</label>
		</li>
	</ul>
	<div class="btn_wrap">
		<button type="submit" class="btn">Submit</button>
	</div>
</div>
The most important here is to prescribe required attributes name in inputs. You can read more detailed about the possible values of attributes name in following documentation - https://help.shopify.com/themes/development/templates/customers-addresses
Next step we should do is to add required form, which is responsible for adding additional information. We have the special form for this:
{% form 'customer_address', customer.new_address %}Add the following code:
{% form 'customer_address', customer.new_address %}
<div class="form_wrap">
<h3 class="form_title">Information about the company</h3>
<ul class="input_list">
<li class="input_item">
<dl class="form_cell">
<dt class="form_cell_title">
<label for="user_company">Company name:</label>
</dt>
<dd class="form_field_wrap">
<input type="text" id="user_company" placeholder="Enter the full name of the company" name="address[company]" class="form_field ">
</dd>
</dl>
</li>
<li class="input_item">
<dl class="form_cell">
<dt class="form_cell_title">
<label for="user_company">Company address:</label>
</dt>
<dd class="form_field_wrap">
<input type="text" id="user_company" placeholder="Company address" name="address[address1]" class="form_field ">
</dd>
</dl>
</li>
<li class="input_item">
<dl class="form_cell">
<dt class="form_cell_title">
<label for="user_phone">Phone number:</label>
</dt>
<dd class="form_field_wrap">
<input type="tel" id="user_phone" placeholder="+7 (XXX) XXX-XX-XX" name="address[phone]" class="form_field">
</dd>
</dl>
</li>
<li class="input_item">
<dl class="form_cell">
<dt class="form_cell_title form_v2_mod">
<label for="user_inn">INN:</label>
</dt>
<dd class="form_field_wrap">
<input type="text" id="user_inn" placeholder="ХХХХХХХХХХ" name="address[zip]" class="form_field">
</dd>
</dl>
</li>
<li class="input_item row_mod right_mod">
<label class="radio_check">
<input required name="check" type="checkbox" checked="checked" class="radio_check_input"><span class="radio_check_text"> I agree with the terms of the use of the site </span>
</label>
</li>
</ul>
<div class="btn_wrap">
<button type="submit" class="btn">Submit</button>
</div>
</div>
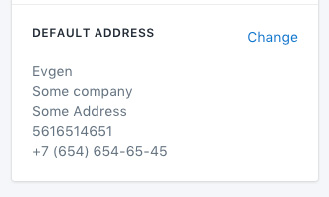
{% endform %}Now let’s go to your-store-name.myshopify.com/account/addresses and fill the form we have just created, after filling, click the button “Submit”. After we have added some information, we can look through it via the admin panel in the tab ‘Customers’ by selecting your account, and in the block ‘DEFAULT ADDRESS’ will be displayed information we have filled in the form.
We also need to write following values in the inputs:
{% form 'customer_address', customer.new_address %}
	<div class="form_wrap">
		<h3 class="form_title">Information about the company</h3>
		<ul class="input_list">
			<li class="input_item">
				<dl class="form_cell">
					<dt class="form_cell_title">
						<label for="user_company">Company name:</label>
					</dt>
					<dd class="form_field_wrap">
						<input value="{{ customer.default_address.company }}" type="text" id="user_company" placeholder="Enter the full name of the company" name="address[company]" class="form_field ">
					</dd>
				</dl>
			</li>
			<li class="input_item">
				<dl class="form_cell">
					<dt class="form_cell_title">
						<label for="user_company">Company address:</label>
					</dt>
					<dd class="form_field_wrap">
						<input value="{{ customer.default_address.address1 }}" type="text" id="user_company" placeholder="Company address" name="address[address1]" class="form_field ">
					</dd>
				</dl>
			</li>
			<li class="input_item">
				<dl class="form_cell">
					<dt class="form_cell_title">
						<label for="user_phone">Phone number:</label>
					</dt>
					<dd class="form_field_wrap">
						<input value="{{ customer.default_address.phone }}" type="tel" id="user_phone" placeholder="+7 (XXX) XXX-XX-XX" name="address[phone]" class="form_field">
					</dd>
				</dl>
			</li>
			<li class="input_item">
				<dl class="form_cell">
					<dt class="form_cell_title form_v2_mod">
						<label for="user_inn">INN:</label>
					</dt>
					<dd class="form_field_wrap">
						<input value="{{ customer.default_address.zip }}" type="text" id="user_inn" placeholder="ХХХХХХХХХХ" name="address[zip]" class="form_field">
					</dd>
				</dl>
			</li>
			<li class="input_item row_mod right_mod">
				<label class="radio_check">
					<input required name="check" type="checkbox" checked="checked" class="radio_check_input"><span class="radio_check_text"> I agree with the terms of the use of the site </span>
				</label>
			</li>
		</ul>
		<div class="btn_wrap">
			<button type="submit" class="btn">Submit</button>
		</div>
	</div>
{% endform %}
We are doing this for when the next time we want to go to the addresses page again, after we have filled these fields and sent the form, we will see the following picture:
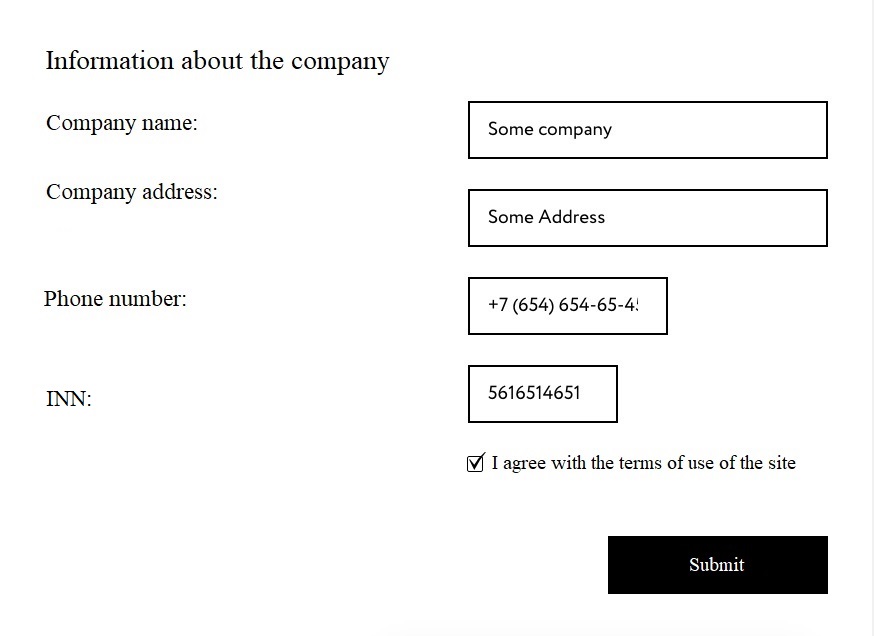
So we have just substituted values that we have filled in before.