Shopify: password recovery and reset
In this article we will learn how to create the page and the template for password recovery and reset, and we will edit the file
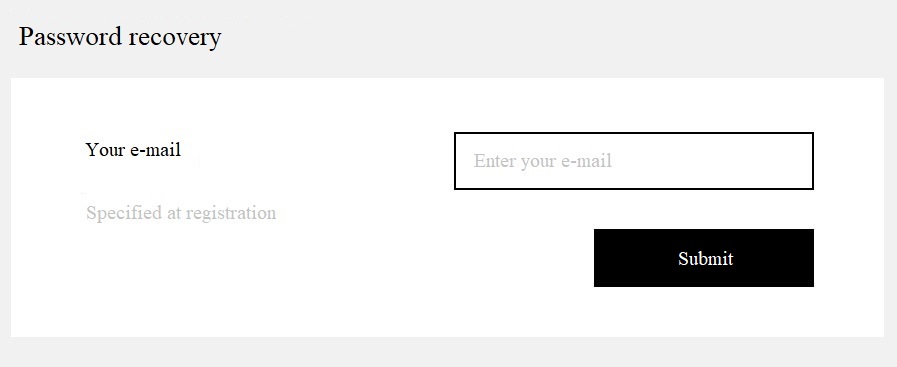
reset_password.liquid</b>. We are going to work with such form:
1.Creating the template
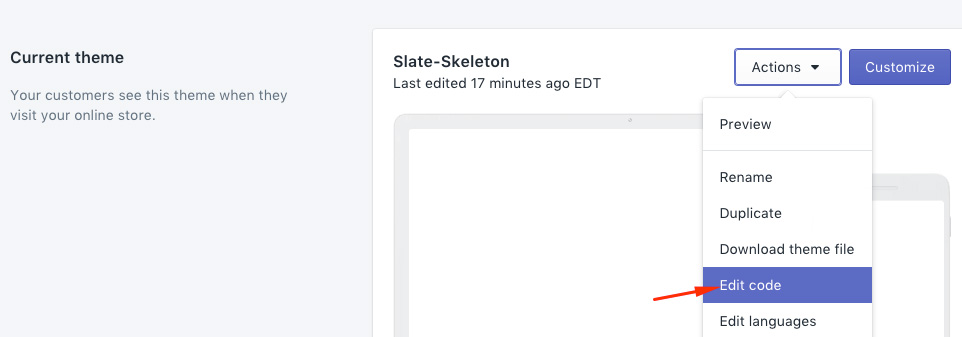
As we don’t have the template for password recovery in Shopify, we will need to make it. It can be done via the admin panel. To do this we go to the tab ‘Themes’, select current theme, click the button ‘Actions’, and choose ‘Edit code’.
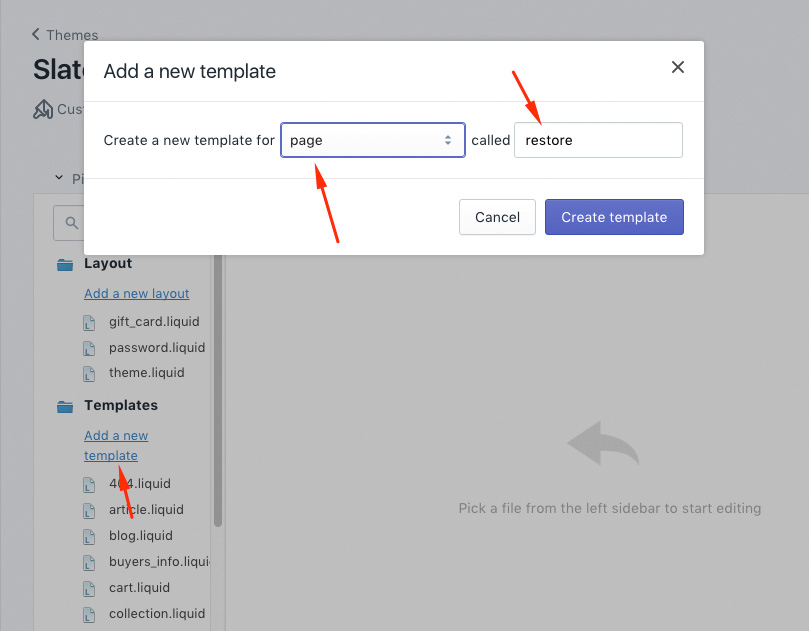
After that we create a new template using button ‘Add a new template’, select the template ‘page’ from the list, and name it ‘restore’, then we click on ‘Create template’.
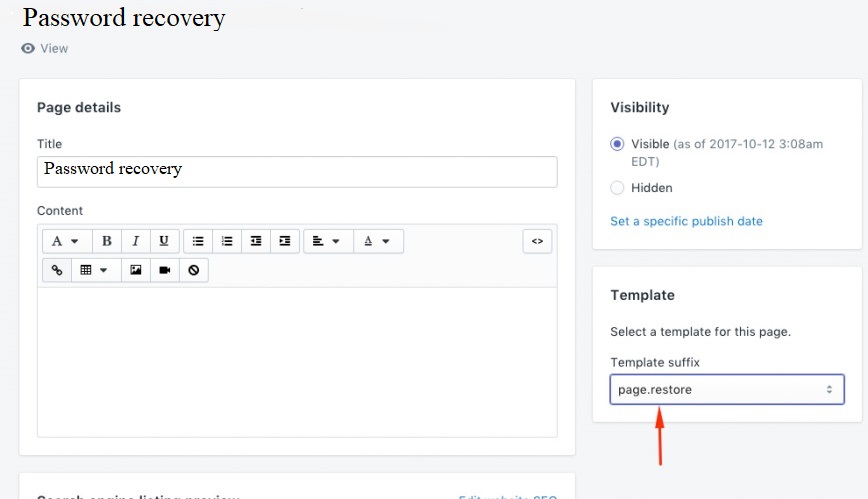
Next what we need to do is to create the page for password recovery, to do this we go to the admin panel in ‘Pages’ and create the new page by clicking the button ‘Add page’.
Enter the name of the page, in the option ‘Template’ select the template that we have just created, it’s ‘page.restore’. After that we save our page.
2.Creating the structure
Next step we need to do is to add the structure for our form. Open the template page.restore and add the following code there:
<h2 class="title_h2">Password recovery</h2>
<div class="form_wrap">
	<ul class="input_list">
		<li class="input_item">
			<div class="input_left">
				<label for="user_email" class="input_label">Your E-mail:</label>
				<div class="input_descr">Specified at registration</div>
			</div>
			<div class="input_right">
				<input id="user_email" type="email" placeholder="Enter your e-mail" name="email" class="form_field default_mod">
			</div>
		</li>
	</ul>
	<div class="btn_wrap">
		<button type="submit" class="btn">Submit</button>
	</div>
</div>
After the structure is made, we need to add the tag ‘form’ with the attribute ‘recover_customer_password’. I think it should be clear what it is responsible for, considering its name . We should get the following:
<h2 class="title_h2">Password recovery</h2>
{% form 'recover_customer_password' %}
	<div class="form_wrap">
		<ul class="input_list">
			<li class="input_item">
				<div class="input_left">
					<label for="user_email" class="input_label">Your E-mail:</label>
					<div class="input_descr">Specified at registration</div>
				</div>
				<div class="input_right">
					<input id="user_email" type="email" placeholder="Enter your e-mail" name="email" class="form_field default_mod">
				</div>
			</li>
		</ul>
		<div class="btn_wrap">
			<button type="submit" class="btn">Submit</button>
		</div>
	</div>
{% endform %}
Now let’s go to your-store-name.myshopify.com/pages/restore
After that, enter your email in the input (the account must already exist), and click ‘Submit’. Thereafter, you will find this message in your e-mail:
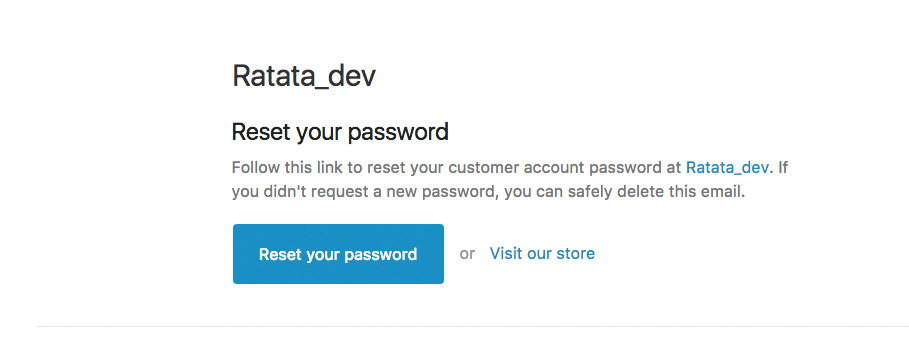
Of course, the store will have another name. For now, we don’t click ‘Reset your password’.
3.Creating the structure for the template reset_password.liquid
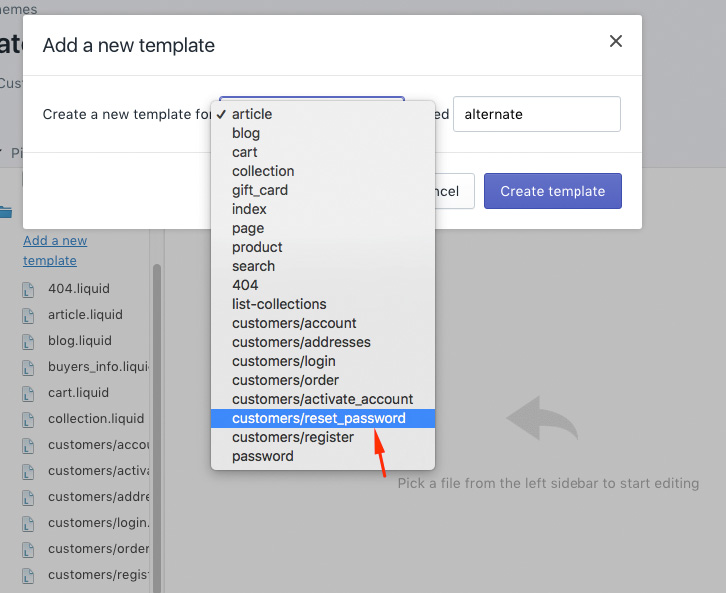
The file reset_password.liquid is responsible for password reset. If you don’t have it, you can create it via the admin panel by selecting file ‘reset_password’
If there is some information, you need to delete it and add the following code:
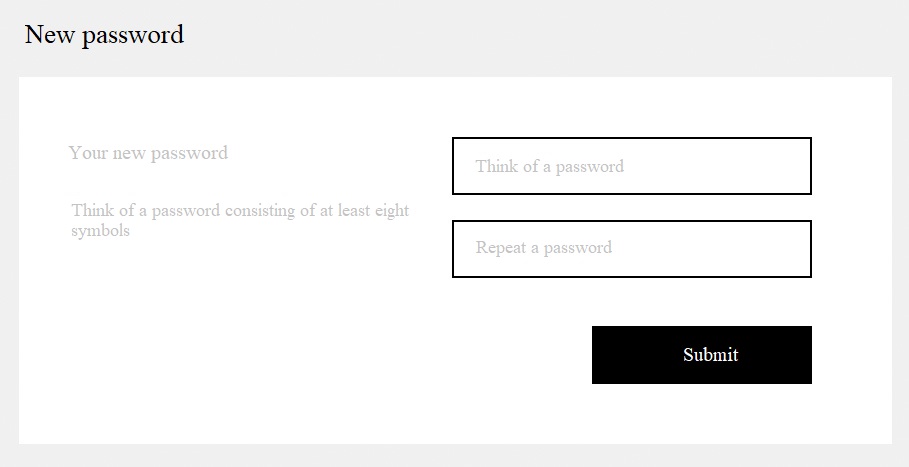
<h2 class="title_h2">New password</h2>
{% form 'reset_customer_password' %}
	<div class="form_wrap">
		<ul class="input_list">
			<li class="input_item">
				<div class="input_left">
					<label for="user_email" class="input_label">Your new password:</label>
					<div class="input_descr">Think of a password consisting of at least eight symbols</div>
				</div>
				<div class="input_right">
					<input id="user_pass" type="password" placeholder="Think of a password" name="customer[password]" class="form_field default_mod">
					<input type="password" placeholder="Repeat a password" name="customer[password_confirmation]" class="form_field default_mod">
				</div>
			</li>
		</ul>
		<div class="btn_wrap">
			<button type="submit" class="btn">Enter</button>
		</div>
	</div>
{% endform %}
Here we have added a little bit more additional structure + added the form with attribute ‘reset_customer_password’, which is responsible for password reset. Also, the second field customer[password_confirmation] must have inputs with attributes name with values customer[password]. After that we save our file. Now log on your e-mail and click the button ‘Reset your password’, then we get to the template reset_password.liquid that we have just edited, here you should see:
If you don’t have any styles, of course, the form will look totally different, but we will not spend time on adding the styles in this article. After you have entered new password and submitted, you will log on your account and your password will be changed.